Post by Diesel Boss on Mar 4, 2015 17:28:19 GMT -6
Hello all! In this tutorial, I’m going to show y’all how to upload screenshots properly to our ‘Screenshots’ section. So let’s get a move on, shall we?
Step 1: Image Hosting Website
To do this properly, you are going to need an image hosting website, such as: Flickr, Photobucket, TinyPic, Imgur, or Postimage. I recommend Flickr for your screenshots, and Photobucket for any other images.
Step 2: Uploading your Image
In this step, I will show you how to upload your image to Flickr and get the code needed.
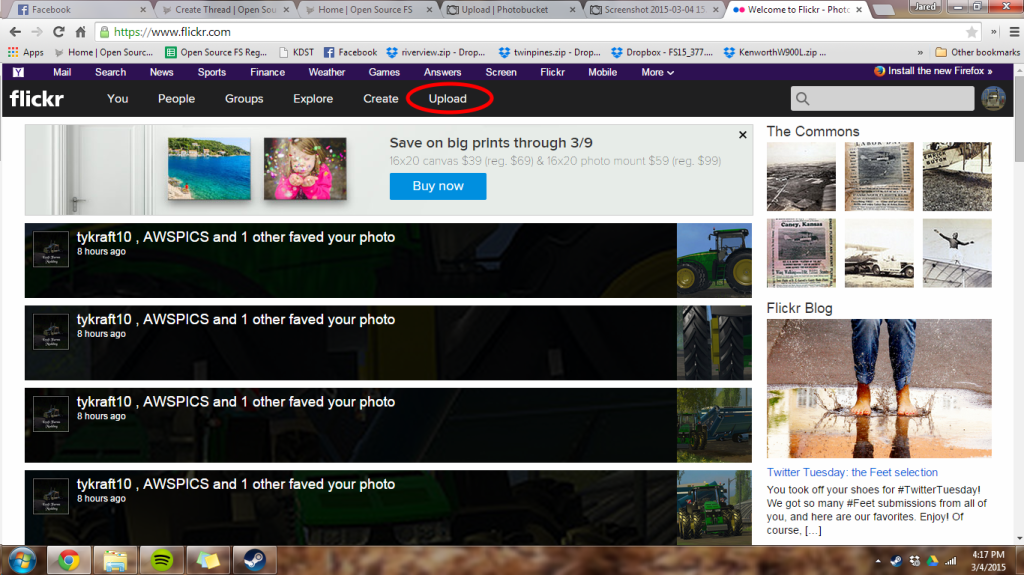
First off, you are going to click on ‘Upload’ in the black header bar near the top of the page.
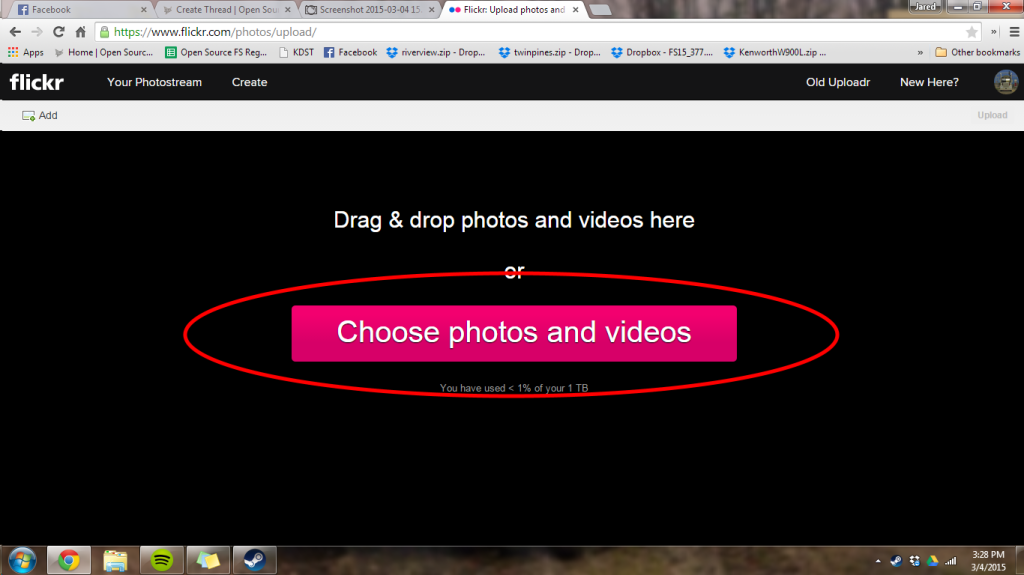
Then, it’s going to bring you to a page to either ‘Drag and Drop’ or select your wished photos. For my example, im going to click on the big, pink button that says ‘Choose photos and videos’.
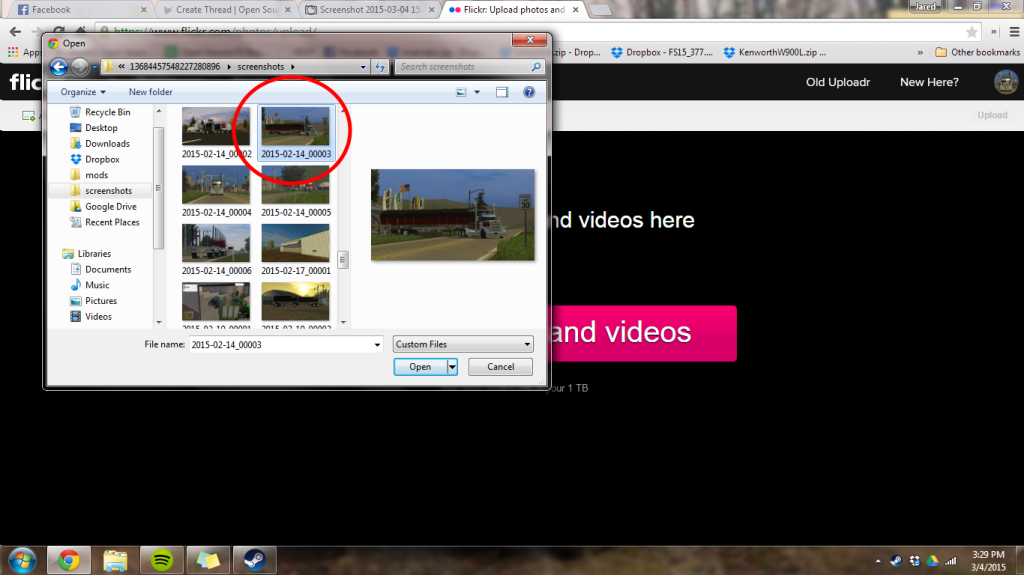
It will then open a file on your computer, to select your photo(s). For this tutorial, I will be using LMBFarmer’s “Jack of Spades” Peterbilt 388. Select your photo and click ‘Open’.
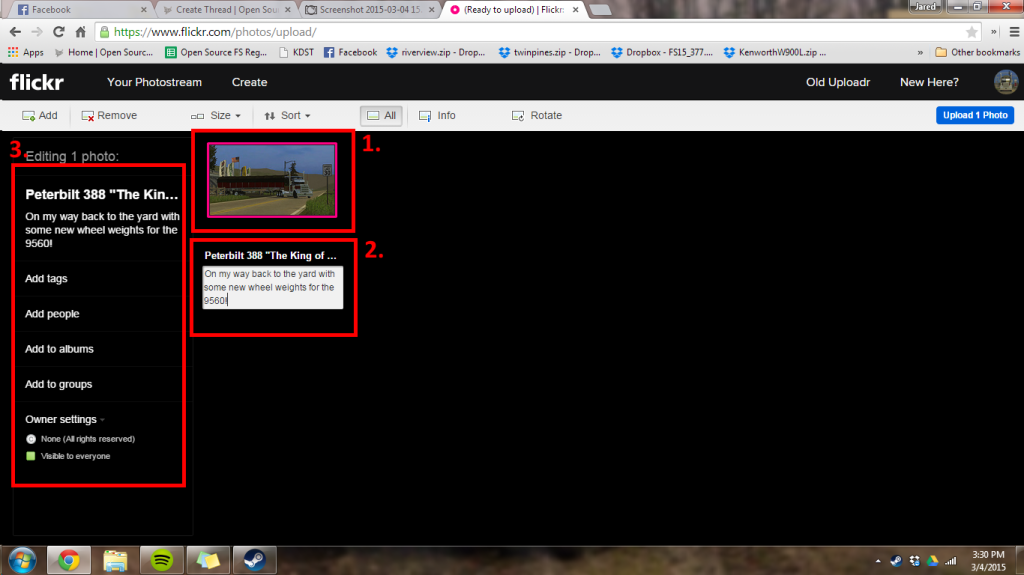
You will then be brought to a page to edit all the properties of your photo. In box 1. it will show a picture of the photo that you’re uploading to make sure it is the right photo. In box 2. you edit the Title and Description of your desired photo. In box 3. If you want to upload many photos, you can edit all the titles and descriptions at once there to save time if you want the Title and Description to be the same for every photo. There’s also some more play-around goodies for you to explore in box 3.
After you have edited the photo’s Title and Description to your liking, click on the blue box in the upper right that says ‘Upload _ Photo(s)’
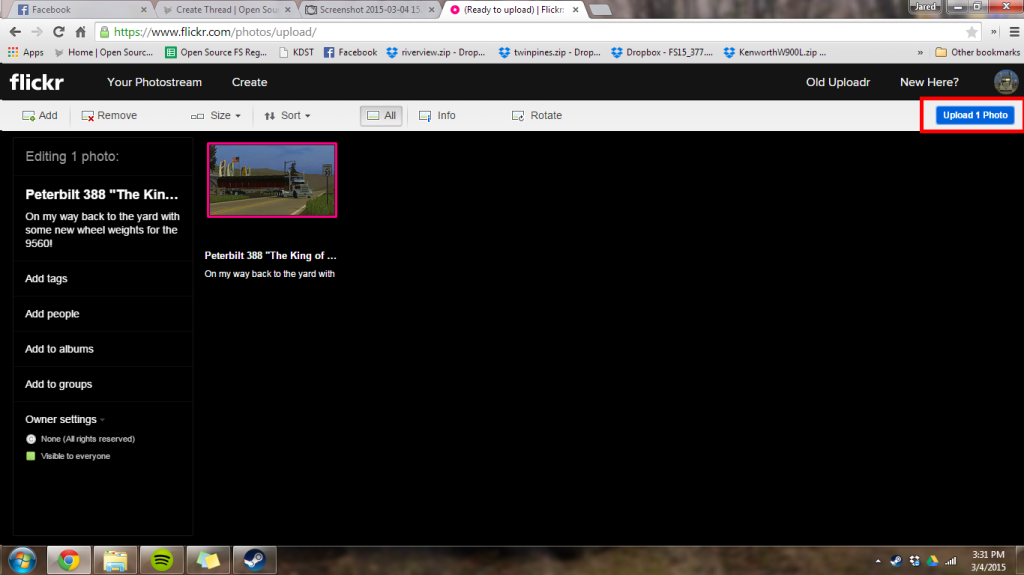
After you click the blue box, another box will pop up asking you if you wish to upload, or continue editing your properties. If you are indeed satisfied, click ‘Upload’
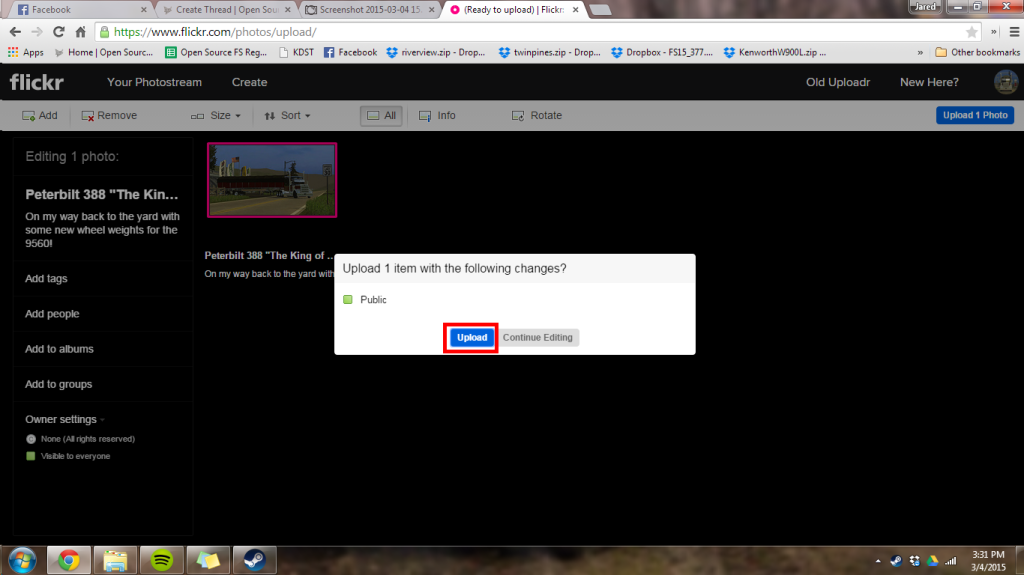
Then, yet another box will appear. Except this one has a loading bar and this time, it is uploading your photos. Waiting time may vary depending on how many photos you are trying to upload.

Once all your photos have finished uploading, you will be redirected to your ‘Photostream’. Your photostream is all of the photos you have uploaded since you joined Flickr. Mine is in the red box.
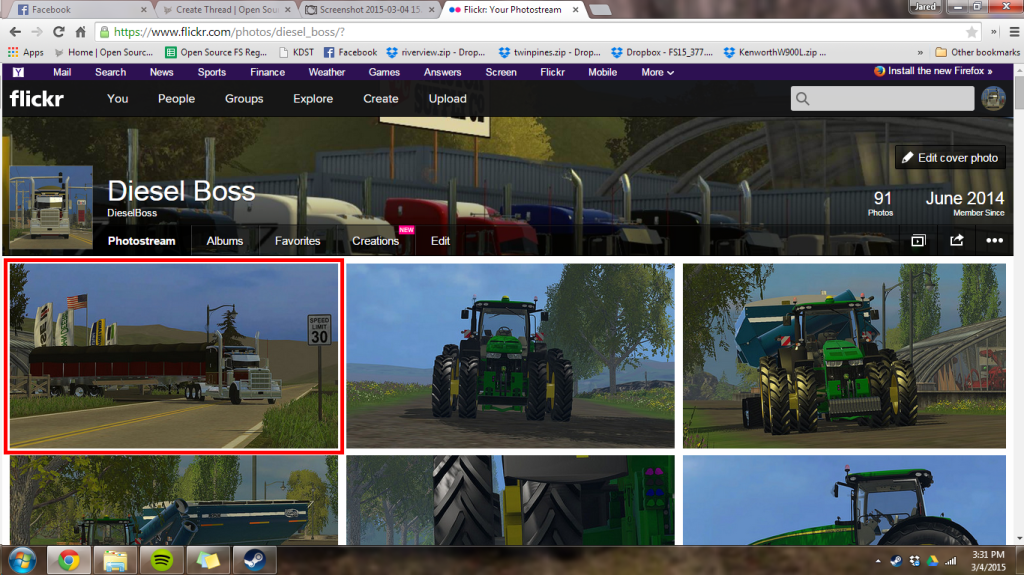
Then you want to click on the photo you wish to get your BB Code for. Once you click the photo, it should look like this:

Once you get to that view, you want to click on the little ‘Share’ arrow in the lower right, pictured on box 1. But wait! Before you copy the link and post it, make you have ‘BB Code’ selected, shown in box 2. Also, you can make the photo for the BB Code any size you wish, that it lists there. For our forum, make sure you have ‘Original ____ x ___’ selected, shown in box 3. Then the BB Code for that image is ready to be copied in box 4.

Step 3: Uploading to our Screenshots section
Once you have it copied, go to the Screenshot section in our forum. If you post the BB Code exactly like that, you will have some links with it.
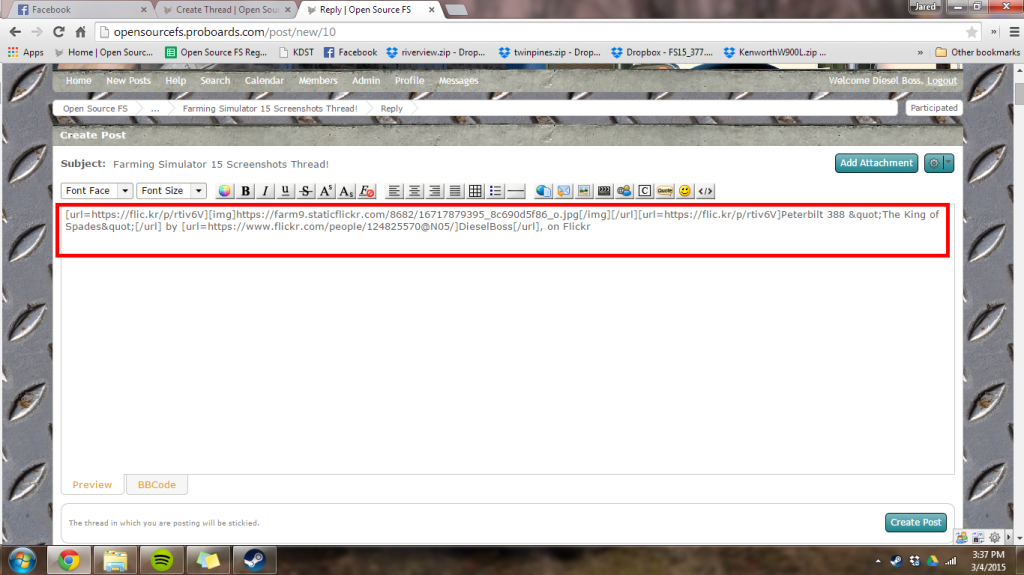
Then it will show up as this:
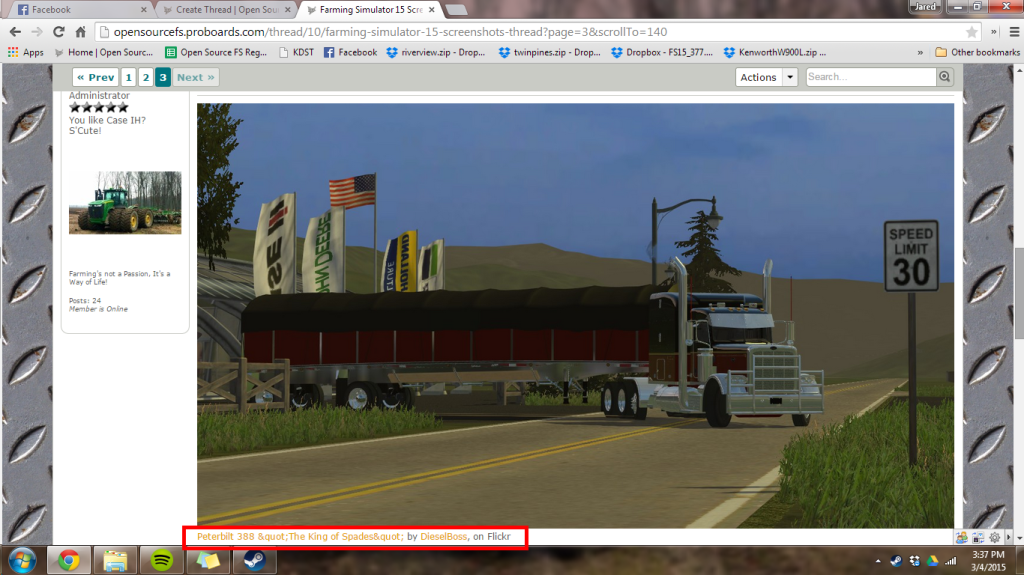
Notice those links below the image? We don’t want those. So if you edit your post, and remove everything except what is in the![]() [/IMG] tags, then only the image will appear.
[/IMG] tags, then only the image will appear.
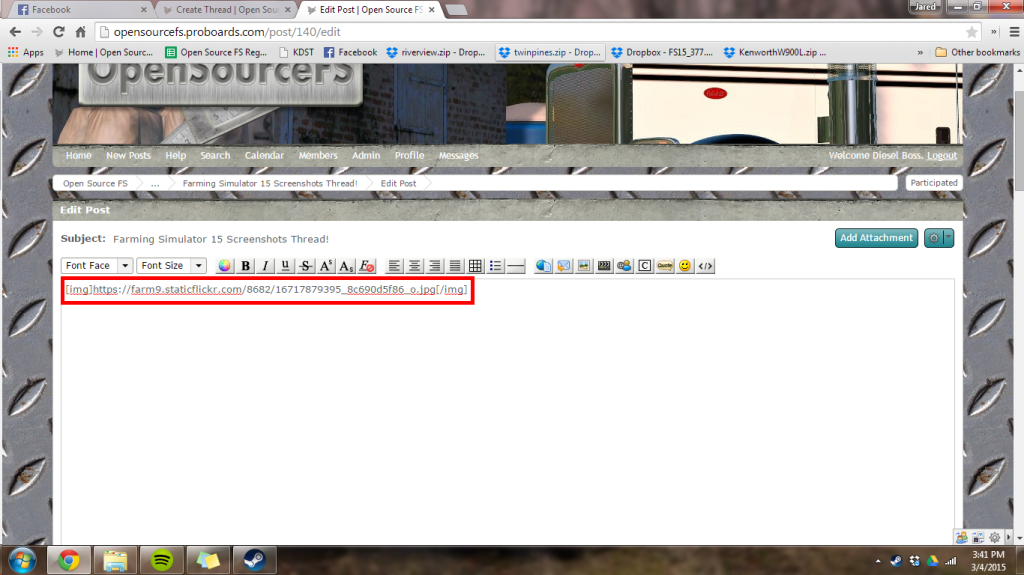
Then it will show as this:

That is what we want it to show as! I hope this tutorial helps a lot of people, and if you have questions, feel free to comment!
Step 1: Image Hosting Website
To do this properly, you are going to need an image hosting website, such as: Flickr, Photobucket, TinyPic, Imgur, or Postimage. I recommend Flickr for your screenshots, and Photobucket for any other images.
Step 2: Uploading your Image
In this step, I will show you how to upload your image to Flickr and get the code needed.
First off, you are going to click on ‘Upload’ in the black header bar near the top of the page.

Then, it’s going to bring you to a page to either ‘Drag and Drop’ or select your wished photos. For my example, im going to click on the big, pink button that says ‘Choose photos and videos’.

It will then open a file on your computer, to select your photo(s). For this tutorial, I will be using LMBFarmer’s “Jack of Spades” Peterbilt 388. Select your photo and click ‘Open’.

You will then be brought to a page to edit all the properties of your photo. In box 1. it will show a picture of the photo that you’re uploading to make sure it is the right photo. In box 2. you edit the Title and Description of your desired photo. In box 3. If you want to upload many photos, you can edit all the titles and descriptions at once there to save time if you want the Title and Description to be the same for every photo. There’s also some more play-around goodies for you to explore in box 3.

After you have edited the photo’s Title and Description to your liking, click on the blue box in the upper right that says ‘Upload _ Photo(s)’

After you click the blue box, another box will pop up asking you if you wish to upload, or continue editing your properties. If you are indeed satisfied, click ‘Upload’

Then, yet another box will appear. Except this one has a loading bar and this time, it is uploading your photos. Waiting time may vary depending on how many photos you are trying to upload.

Once all your photos have finished uploading, you will be redirected to your ‘Photostream’. Your photostream is all of the photos you have uploaded since you joined Flickr. Mine is in the red box.

Then you want to click on the photo you wish to get your BB Code for. Once you click the photo, it should look like this:

Once you get to that view, you want to click on the little ‘Share’ arrow in the lower right, pictured on box 1. But wait! Before you copy the link and post it, make you have ‘BB Code’ selected, shown in box 2. Also, you can make the photo for the BB Code any size you wish, that it lists there. For our forum, make sure you have ‘Original ____ x ___’ selected, shown in box 3. Then the BB Code for that image is ready to be copied in box 4.

Step 3: Uploading to our Screenshots section
Once you have it copied, go to the Screenshot section in our forum. If you post the BB Code exactly like that, you will have some links with it.

Then it will show up as this:

Notice those links below the image? We don’t want those. So if you edit your post, and remove everything except what is in the

Then it will show as this:

That is what we want it to show as! I hope this tutorial helps a lot of people, and if you have questions, feel free to comment!


